
Adding Fields
How can I add my own fields to the calendar?
You can show fields from your own table(s) in two places in the calendar: on the main calendar views (like Day, Week, and Month), and in the event detail popover (what you see when you click on an event). You'll configure both of these displays by manipulating the field mapping that describes each of your calendar sources for DayBack. Here are a few details of field mapping you may have missed...
Note: Field mapping is a bit different in Salesforce and FileMaker - and there's no mapping to be done in Google, Office 365, or Basecamp since you can't alter the default fields there. Read about field mapping in Salesforce or in FileMaker.
Formatting the item's title

The item detail popover (what you see when you click on an event)
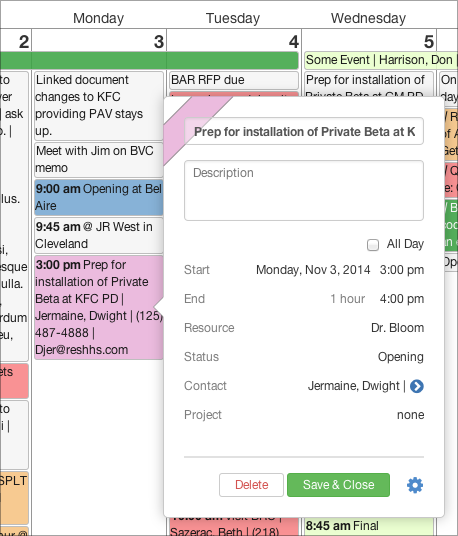
Notes for each field are available by clicking "Details...". A couple of fields deserve special attention:
-
Status: this is the field by which we color-code your events. Now this may not be a "status", it could be a division with your company, or a process, but color-coding by some field is cool. You can change the word "status" in the calendar's display by editing DayBack's translation settings.Resource: this is the field that becomes a column on the calendar's "Resource" view. Again, resources may be salespeople, trucks, or barbershop chairs. If you have a resource that folks compete for in your business, this is where you map that. This is a very powerful way to look at your items (and to make sense of a dense calendar) so read up on resources here.
Adding More Fields
Include as many additional fields as you need on a drawer beside the item detail popover by configuring "Additional Fields" when setting up your sources. Details are here: Additional Fields.
Salesforce Specific
If you're just using the Events, Tasks, and Campaigns sources DayBack maps for you, maybe you haven't seen field mapping before. Take a minute to review field mapping before continuing. Below we'll discuss how to refine an item's display via field mapping. Learn more about field mapping
Using custom fields
You can include custom fields when you define your calendar sources. Just remember that Salesforce gives your custom field a suffix so if you have a custom field called "Sample", for example, the field's name in Salesforce is "Sample__c" (without the quotes).
Note that you can also include the item's "related to" name (a lead or contact, for example) and it's related "what" (a campaign or opportunity, for example). These are usually included as Who.Name, What.Name .(For more on setting up these related contain and project objects, see related who and what.)
Use your own Salesforce Layouts
If you have way too many fields to show up in the DayBack popover shown above you can access more fields on our own Salesforce layouts. One way to do this is to include a custom action (a button) that takes you to your record in its own layout. DayBack comes with one of these "Go to Event' buttons in the "Events" source: you can just copy the code for that button and use it on any object you're seeing in DayBack.
If you're in Lightning Experience, you can create a different button that will bring up the event's layout without you having to leave the calendar:

These "modal edit boxes" are a great way to see more fields than you'd normally be able to see in the calendar. And you can get to them either by clicking a button, or you can set up DayBack so that it brings these up as soon as you click on an event. A video of this in action, along with step-by-step instructions for implementing this in your org can be found here: Add Your Own Fields to the Calendar: Using Lightning Modal Boxes in Salesforce
FileMaker Specific
Calculated fields in the event title
You can include as many fields in the title as you'd like (and include as many additional fields as you need), just know that the "deeper" DayBack goes across your FileMaker relationships, the slower the calendar will be at retrieving this data from FileMaker Server. So if you only use fields from your events table, it will be pretty fast. If you include related fields it will slow down slightly but related fields are so useful everyone uses them (the contact's phone number in our example is a related field). If you include summary fields or summary calcs it can really slow down.
Using your own FileMaker layouts to edit events
If you have a ton of event fields (like many small medical practices do), you may want to use your own FileMaker layout instead of the event popover in DayBack. DayBack is running in a browser, so you can't just ask it to use a FileMaker layout, but you can create custom actions that open an event in FileMaker Pro, Go, or WebDirect depending on the kind of URL you enter. More here: Custom Actions.